Thursday, 29 December 2011

Articulate Ghost Shrimp and Crayfish

Articulate Ghost Shrimp


Articulate Crayfish
This is an Articulate version of Ghost Shrimp and Crayfish, which I intend to give more action to the pattern, adding life and action to the fly.
The head and the pincher move very well in water and when you strip.
I hope this pattern will bring you luck and catch some fish for you.

Materials:

Hook - Saltwater hook
Weight - Dumb bell 
Body - Angle hair ( White )
Eye - Burned Mono Eye
Antenna - Pheasant tail fiber
Flashabou and cralf hair for mouth part
Legs - Rubber legs
Dubbing - SLF dub Pink / Yellow / Orange

Step by step tying instructions:

Cur a short pcs of hard wire about 1 inch

Tie a short pcs of tooth pick to create the taper shape of a Shrimp or Crafyfish

Tie in the mono eye at both side 

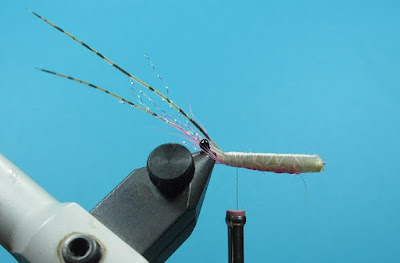
Tie in the antenna, flashabou and calf hair

Tie in the 1st pair of rubber leg

Dub in the mixture of Pink and Orange dubbing near the eye

Tie a knob at the Angel hair, create as pincher, tie in at both side

Tie in another 2 pair of rubber legs

Dub in the mixture of Orange and Yellow dubbing

Fold over the Angel Hair and trim the fiber, the head profile is read

Tie in another Angel Hair as body part and glue it down with epoxy

Dry up the epoxy

Now... remove the head profile...

Put in the hook, tie in the dumb bell and apply some dubbing

Split the body part hair to half, pull it thru and tie down

Fold the fiber and tie down... trim the fiber

Continue doing the dubbing and tie down some fiber to create the body

Trim the fiber...

If you wish.. you may apply some marker to create the fly either Shrimp or Crayfish

Now the Articulate Ghost Shrimp is ready... try test it in a tank.. you will find it's alive...


Tuesday, 20 December 2011

Mylar Minnow Variations

Articulate Mylar Minnow


Mosquito Fish
Mylar Minnow
Mylar Anchovies
Articulate Mylar Minnow with flylipps

Mylar Candy with flylipps

Monday, 12 December 2011

Mylar Minnow

Mylar Minnow

Materials:

Pearl Mylar tube
Saltwater Hook
3D epoxy eye
UV Clear epoxy
Nylon line for belly
Color Marker

Step by step tying instructions:

Cut a short length of Pearl Mylar tube, heat it and apply with some tension to fuse and create a taper body

Few tapered Mylar tube body are ready

Prepare the belly with the nylon line / rope material ( I use the existing rope from the Mylar tube )

Color the belly with the marker

Insert in the Mylar tube to the hook and tie down 

Put in a pair of 3D epoxy eye, apply the UV clear epoxy, rotate the fly to get an even coverage of epoxy

Dry up the epoxy with UV light, remember to rotate the fly. 

The Mylar Minnow is ready. ( an Anchovies Fly / Ikan Billis pattern )

Important tips:
Always apply minimum epoxy, apply layers of epoxy to shape it.
Always rotate the fly to get an even coverage of epoxy 
You may put in some color after you 1st coat of epoxy, to create different fry or minnow pattern

I believe there are many different Mylar Minnow can be created by using different diameter and different type of Mylar tube

Another Mylay Minnow version... Articulate Mylar Minnow
This version will give more action and life to the fly


Thursday, 1 December 2011

Foamular of Jungle Ants

Foam Jungle Ants

Materials:

Hook - Gamakatsu B10S size 8-10
Abdomen and body - 3mm thk close cell foam
Antenna - Brush fiber ( black )
Eye - Small drop of black Loon Hard Head
Leg - Rubber legs

Step by step tying instructions:

Prepare the hook 

Tie in the 3mm thks close cell foam

Fold over the foam and tie down at about half of the hook

Tie down the thorax

Cut the foam and trim the head

Cut out the mouth part

Use needle to pull over the fiber as antenna

Drop some super glue to secure the antenna

Trim the fiber and fold the to form the antenna

Pull over the rubber legs at the thorax area

Apply some Flexament to the leg ( the chemical reaction will bend the rubber legs )
Drop the hard head as eye

If you wish to have color to the ants... color it with marker before dropping the hard head as eye

Cheers... happy tying....